Installation
Environment Setup
we provides two methods to install MPicker, using Conda or using a offline package without Conda.
Using Conda
- Download
MPicker_code.tar.gz. - Uncompress it into an empty folder. Let's call it
/absolute/path_to/save_code. Replace it with the actual path where you want to install MPicker.mkdir /absolute/path_to/save_code tar -zxvf MPicker_code.tar.gz -C /absolute/path_to/save_code - You can edit the
env.ymlfile in the folderpath_to/save_code/mpicker_gui:- Change "mpicker_full" to your preferred environment name.
- Modify "
cudatoolkit=11.0" to another version if your GPU driver doesn't support it (e.g., =10.1 or =9.2). - The library versions don't have to match exactly as in the yml file. We just provide the versions we use. However,
scipy>=1.7,yacs>=0.1.8, andpyqt=5must be satisfied. We chooseopen3d=0.9.0for compatibility with older systems, but newer versions are allowed if your machine supports it.
- Create the Conda environment from this file (may take 10 minutes or more):
conda env create -f path_to/save_code/mpicker_gui/env.yml - Finally, activate the environment with:
conda activate mpicker_full
Without Conda
We still recommend using Conda because our offline environment package is quite large, and Conda is commonly used in Python. You can install Conda from https://docs.conda.io/projects/miniconda/en/latest/.
We generate the environment packages using conda-pack on CentOS7, but it should work for other Linux systems. You have to use Conda if your system is not Linux.
- Download
MPicker_environment.tar.gzandMPicker_code.tar.gz. - Uncompress them into two different empty folders. Let's call them
/absolute/path_to/save_codeand/absolute/path_to/save_env. Replace them with the real paths where you want to install MPicker.mkdir /absolute/path_to/save_code tar -zxvf MPicker_code.tar.gz -C /absolute/path_to/save_code mkdir /absolute/path_to/save_env tar -zxvf MPicker_environment.tar.gz -C /absolute/path_to/save_env - Unpack the Conda environment (only need to do this once):
source path_to/save_env/bin/activate
conda-unpack
source path_to/save_env/bin/deactivate
After installation, you can activate the environment using:
source path_to/save_env/bin/activate
and deactivate it using:
source path_to/save_env/bin/deactivate
Environment Setup without Membrane Segmentation
This version doesn't include AI-based automatic membrane segmentation but requires less libraries and has a smaller installation size.
- Replace
MPicker_code.tar.gzwithMPicker_code_noseg.tar.gz, which lacks the foldermemseg_v3. - Replace
MPicker_environment.tar.gzwithMPicker_environment_noseg.tar.gzif you set up environment without Conda. - Replace the
env.ymlfile withenv_simple.ymlif you set up environment by Conda. - In fact, you can use most of MPicker's functions in the environment of IsoNet, but
scipymust be >=1.7.
Get Started
Quick Start Guide
First, activate the environment. Verify the Python environment using:
which python
Expect a path like:
path_to/save_env/bin/python # if without conda
path_to/miniconda/envs/mpicker_full/bin/python # if using conda
Run the following command to open Mpicker:
python path_to/save_code/mpicker_gui/Mpicker_gui.py
Alternatively, add path_to/save_code/mpicker_gui to your $PATH and open Mpicker with:
Mpicker_gui.py
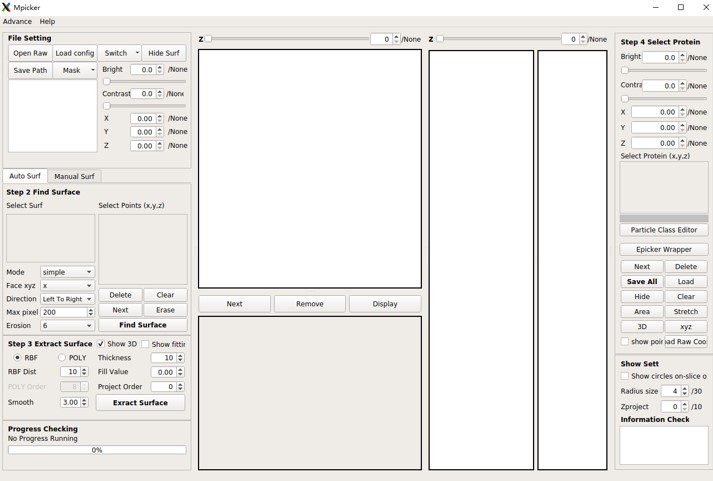
Then you will get the following GUI:
Troubleshooting
- For Linux users: If your shell is not bash (e.g., csh), switching to bash may resolve environment setup issues. Check your shell using:
echo $0 - If executing .py files directly fails, try running
bin/mpicker.sh, a bash wrapper. Addpath_to/save_code/binto your PATH, activate the environment, and run MPicker using:mpicker.sh - Modify
PYTHON="$(which python)"inbin/mpicker.shtoPYTHON=/absolute/path_of/pythonif your system fails to locate the installed Python. This allows running Mpicker withmpicker.shwithout activating the environment first.
Command Start
Mpicker support these parameters input from command line:
--raw Path of raw tomogram map
--mask Path fo mask tomogram map
--out Existed path to save all the result files
--config Path of config file (config file for reloading all the process history)
Example: (Open a new GUI)
Mpicker_gui.py --raw tomogram.mrc --mask segmentation.mrc --out ./
Example: (Reload a existing job)
Mpicker_gui.py --config ./tomogram.config