Tutorial
Overview
These hands-on tutorials will walk through EPicker. Before run the tutorial, make sure:
- EPicker is correctly installed.
- The path of the EPicker executables /EPickerInstallationPath/EPicker/bin has been added into the environment $PATH.
- The required model is avilable.
- A GPU is avilable to run EPicker.
Tutorial-1 Pick particles using general single particle model
This section shows how to pick particles using "particle" mode. The demo data is two micrographs of T20S Proteasome from EMPIAR-10025. The general model of particle mode was used to pick the particles.
Step 1: Download the demo detaset and unzip
tar -jxvf Particle_Proteasome_EMPIAR10025.tar.bz2
cd Particle_Proteasome_EMPIAR10025
You will see 2 micrographs in data folder. Then, we pick the particles on these micrographs.
Step 2: Run the following command
epicker.sh --data ./data --load_model /ThePathOfModels/single-particle.pth --K 800 --vis_thresh 0.1 --output ./thi --visualHere, prelace the model path (/ThePathOfModels/single-particle.pth) with the actual one. The estimated number of paticles on each micrograph of T20 proteasome is ~600, so, set --K 800 to pick slightly more than the estimated. The picking results will be output to folder ./thi. The default output format of the coordinates is THI file. EPicker also supports other output format by specifying --output_type. The score threshold of particles --vis_thresh is set to filter the bad particles. Because the score for each particle will be output together with the coordinates in THI file, you can also set the threshold to 0 to output all picked particles and filter the bad particle later. --visual option leads to the output an image with picked particles for quick view, like the following. Removing --visual will disable the image output.

Tutorial-2 Pick liposomes using vesicle model
This sections shows how to pick liposomes using "vesicle" mode. The general model of vesicle mode was used to pick the particles. Picking liposome is quite similar as that for particles. The vesicle mode will detect both the position and size of the liposomes.
Step 1: Download the demo detaset and unzip
tar -jxvf Vesicle_Liposome.tar.bz2
cd Vesicle_Liposome
You will see 2 micrographs in data folder. Then, we pick the liposomes on these micrographs.
Step 2: Run the following command
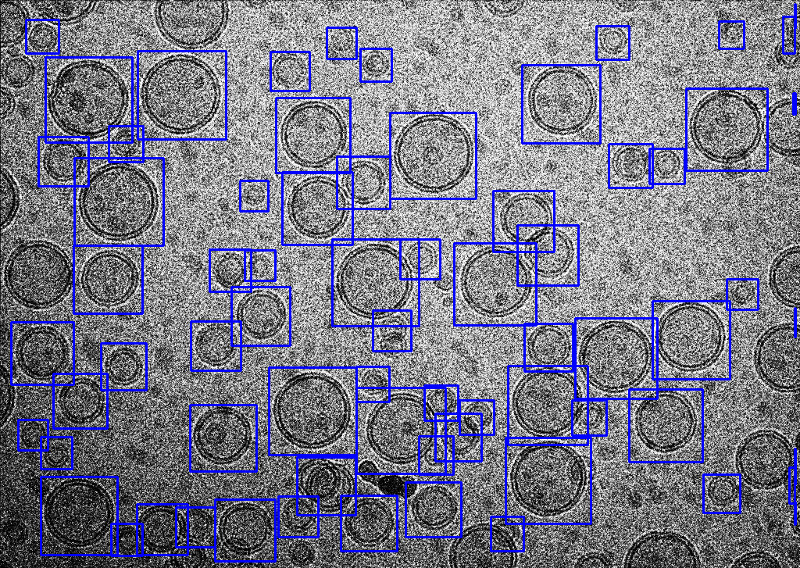
epicker.sh --data ./data --mode vesicle --load_model /ThePathOfModels/liposome.pth --K 100 --vis_thresh 0.01 --output ./thi --edge 5 --visualHere, the option --mode vesicle is set to vesicle mode. The edge width to be ignored is set to 5 by --edge 5, smaller than the default 25, in order to pick more closed to the edge. The score threshold was also set to 0.01 to avoid missing good liposomes. All the other parameters are the same as that for particle mode. A snapshoot of the result is the following.
Tutorial-3 Pick fibers using fiber model
This sections shows how to pick fibers using "fiber" mode. The demo data is two micrographs of TMV from EMPIAR-10305. The general model of fiber mode was used to pick the particles. The fiber picking procedure consists of picking and tracing.
Step 1: Download the demo detaset and unzip
tar -jxvf Fiber_TMV_EMPIAR10305.tar.bz2
cd Fiber_TMV_EMPIAR10305
You will see 2 micrographs in data folder. Then, we pick the fibers on these micrographs.
Step 2: Run the following command
epicker.sh --data ./data --mode fiber --load_model /ThePathOfModels/fiber.pth --K 3000 --output ./thi --visualHere, the option --mode vesicle is set to fiber mode. For fiber picking, a small --K is not recommended becuase it sometimes affects EPicker's tracing performance. You can visualize the tracing results by turning on --visual. EPicker has a build-in tracing method. In the output coordinate THI file, each fiber is described by a set of sequential line segements. For futher single-particle processing, the line segments can be easily converted to segement boxes with given overlap ratio. If you have your own tracing methods, you can set the picking mode to particle mode by --mode particle and still load the mdoel of filber mode. Such setting will disable the tracing, and EPicker only generates a set of point coordinates along the fiber, on which you can apply your own tracing methods. A snapshoot of the result is the following.

Tutorial-4 Train a model from scratch by joint training
This section shows how to train a new model from scratch. As mentioned in the published paper, the training modes of joint training, fine-tuning and training from scratch use the same code. This example use only one T20S proteasome dataset (a subset of EMPIAR-10025) as input. If the input is a mixed dataste of more than one proteins, the training becomes the joint training. If a pre-trained model and a dataset of either a single protein or multple proteins, the training is the fine-tuning on the pre-trained model.
After finish the training, a model will be output and used for further particle picking proteasome.
Step 1: Download the demo dataset and unzip
tar -xvf T20S_proteasome_EMPIAR10025_small.tgz
cd T20S_proteasome_EMPIAR10025_small
You will see 5 micrographs and their labels (.thi files). Then, we train a model from scratch.
Step 2: Run the following command
epicker_train.sh --exp_id proteasome_model --mode particle --data ./T20S_proteasome_small --label ./T20S_proteasome_small --label_type thi --train_pct 80 --test_pct 20 --gpus 0 --lr 1e-4 --batch_size 1 --num_epoch 120 --continual --output_exemplar proteasome_exemplar
Here, the option --exp_id proteasome_model sets the folder name to output. The output model is output in this folder and named model_last.pth. The option --label ./T20S_proteasome_small sets where the label files are located. The option --lr 1e-4 sets the learning rate to 0.0001, which is emprically a good number for most cases. The --batch_size is set to 1 in this case since we only have 4 micrographs. For larger training dataset(over 10 micrographs), we recommend you to use 4. And the option --num_epoch 120 sets the epoch number to 120 which is usually enough for most cases. The option --continual is optional, which turns on the continual learning and output a exemplar dataset togheter with the model. The option --output_exemplar proteasome_exemplar is the folder name where the exemplar data is saved, which should always be used together with --continual.
The program output in terminal is like

Once the model is output, you can use it to pick particles in the mircrographs of the example ddataet or other proteasome dataset, such as EMPIAR-10025.
The command of particle picking is as follows.
epicker.sh --data ./T20S_proteasome_small --load_model ./proteasome_model/model_last.pth --K 700 --vis_thresh 0.1 --output ./T20S_proteasome_output --visual
The results of the particle picking is like

Tutorial-5 Train a model in a continual way
This section shows how to train a new model on a CNG dataset in a continual way based on the model trained in tutorial 4 (please make sure the options --continual and --output_exemplar proteasome_exemplar have been used). After this example you will have a new model able to pick both proteasome and CNG.
Step 1: Download and unzip dataset:
tar -xvf CNG_small.tgz
Step 2: Run the following command
epicker_train.sh --exp_id cng_add_proteasome --mode particle --data ./CNG_small --label ./CNG_small --label_type thi --load_model proteasome_model/model_last.pth --sampling_size 200 --load_exemplar ./proteasome_exemplar --output_exemplar cng_add_proteasome_exemplar --continual --train_pct 80 --test_pct 20 --gpus 0 --lr 1e-4 --batch_size 1 --num_epoch 120
Here, most options are the same as the exemple in tutorial 4. The options --load_model proteasome_model/model_last.pth and --load_exemplar ./proteasome_exemplar load the model and exemplar trained in tutorial 4. And --output_exemplar cng_add_proteasome_exemplar set the output folder for a new exemplar dataset.
If nothing goes wrong, you will see the following output in the terminal

and the output after the training process complete, which list the files seleted and included in the new exemplar dataset .

Once the continual training process is complete, you can see the model file model_last.pth in the output folder defined in --exp_id option and the exemplar defined in --output_exemplar. The exemplar is a folder with many files including annotation files and PNG files from the original exemplar and the new training dataset.
Now the model is able to pick particles of both CNG and proteasome. You can also check the performance of the new model in picking the old micrographs (used in tutorial 4) to evaluate the continual learning ability of EPicker.
Pick particles on old proteasome dataset
epicker.sh --data ./T20S_proteasome_small/ --load_model cng_add_proteasome/model_last.pth --K 700 --vis_thresh 0.1 --output ./proteasome_output --visual
Typical result is as follows

Pick particles on old proteasome dataset
epicker.sh --data ./CNG_small/ --load_model cng_add_proteasome/model_last.pth --K 200 --vis_thresh 0.1 --output ./CNG_output --visual
Pick particles on new CNG dataset
